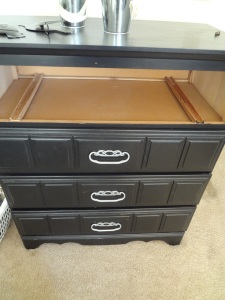
The Dressers: One Black Coat

Here are the dressers with one black coat: WHOOOOOO


They look good from afar, but you can see the brush strokes:

The next coat will look awesome, though!!

My sister in law and I have been doing a lot of crafting for Halloween decorations and Christmas presents! It’s been so fun! I will update with the Halloween decor (including sparkle pumpkin!!) but not the Christmas presents yet. I have to make sure nobody who’s getting one will see it! One of our Christmas presents for our sisters include some chalkboard paint:

I can’t wait to use it for the first time! We were gonna make some out of the black paint I’m already using on the dressers. But, the tile grout section got overwhelming so we just decided to buy some. (Tile grout is needed to make your own in these instructions).

Also, here’s a couple pictures of Ruby, my child, just because she looks so cute today:

Awww such a beautiful, sweet thing!!

Didn’t workout yesterday, whoops… Even though it’s no excuse, I had a bad day and drank instead! So, exercise tonight – some pop cardio and arms workout!!

-Jessica

Update on Dressers

Here are the drawers with one coat of primer:


I went to Sherwin Williams yesterday to get a gallon of real primer (not spray on) and it works SO much better! AND on sale for $19.99 for the gallon

Will be doing a second coat of primer to all drawers and then deciding how to get the dressers into the sun room where all the drawers are drying on the floor. Maybe put them in the bedroom in place of the dressers… Got to figure out a better temporary place for our clothes before my husband gets too anxious about them being piled up in laundry baskets!

Along with the drawers comes hardware, another small step in this project. I spray painted them once during phase 1 of painting (the failed phase) but will be re-doing them because I couldn’t find the paint I used previously.

Update with coat number 2 –

– Jessica

Hello people!

I’m going to pick things that I want to try and upload how it’s going. My first project: re-painting my dressers. My husband and I moved to South Carolina on January 1st and didn’t have room for our old dressers. So, we chopped them up and threw them in the dump. So, we got moved into our new apartment and had clothes everywhere with no place to put them. So, my lovely husband (the frugal shopper that he is) found us two wooden dressers for $40 from Goodwill. It was very obvious that they were because they had the classic old, Goodwill smell which lingered through the house. There is no way I was putting my clothes in those stinky drawers so I decided to paint them to try to cover up the wonderful scent. They looked amazing when I was finished! But, the paint is already peeling (because I had no clue what I was doing) and the inside of the drawers need to be painted as well. So… painting dressers phase 2 begins now. And I’ll be using primer this time! After Googling around for sites on how to paint wooden dressers I realized my faults and will be giving it another go…

Reference: http://www.sasinteriors.net/2012/08/how-to-paint-laminate-furniture/

Since I don’t have a power sander, I will attempt to hand-sand the smoother parts of the dressers. Maybe I should invest in some power tools…

Here is a before (post phase 1 painting, pre phase 2 painting):

Dresser

Looks good from afar, right?? Not up close:

My husband put a glass of water on the dresser about a week after they were painted. This happened… yes I had to bite my tongue.

Some other issues: I painted the inside of my drawers yellow. And I hate it now. Also, some of the yellow paint got on the outside of the drawers. It looks terrible!

EW

So, the “touch up” of my failed project begins. Any suggestions would be appreciated… updates soon.

A drawer with some spray paint primer and a little bit of hand sanding on the front. I say a little because I got tired and quit..

That took a lot of spray paint. So, I’m going to get some non-spray primer to use. Got a lot of work to do…
– Jessica